はBézier Curveに沿ってプロットされたテキストを取得するPathTransitionの乱用です。
このプログラムでは、コントロールポイントをドラッグしてカーブを定義し、そのカーブに沿ってテキストをプロットすることができます。テキスト内の文字は等間隔に配置されているため、カーブの全長が「通常の」スペーシングでテキストの幅に非常に近く、カーニングなどの調整が行われない場合に最適です。
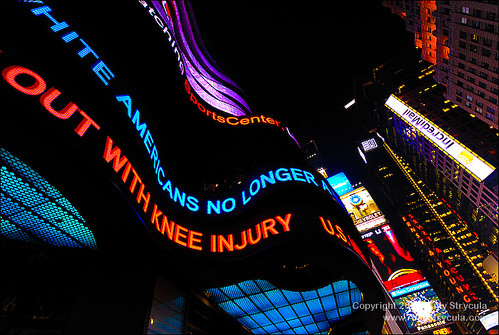
ショー以下のサンプル:glow効果と
- 湾曲したテキスト。
- 効果が適用されていない曲線テキストです。
- 効果なしのテキストを曲線パスで定義するために使用されるコントロール操作ポイントがプロットされています。


ソリューションはStackOverflowの質問に対する回答に基づいて迅速なハックでした:CubicCurve JavaFX。私はより良い解決策がより多くの努力、時間とスキルで見つけられると確信しています。
プログラムはトランジションに基づいているため、テキストをアニメーション化してカーブに沿ってアニメーションしたり、オーバーフロー時に右から左に折り返したりすることができます(marquee textまたは株式チッカー)。
グロウ、シャドウなどの標準的なJavaFXエフェクトやフォントの変更を適用して、質問のpainttshopプロテキストからシャドーエフェクトのようなものを取得することができます。グロー効果は、回転した文字の周りのギザギザのエッジを微妙に柔らかくするので、ここで適用すると良い効果です。
また、このソリューションのPathTransitionは、パスの入力として任意の形状を取ることができるため、テキストは3次曲線だけでなく、他の種類のパスに従うことができます。
import javafx.animation.*;
import javafx.application.Application;
import javafx.beans.property.DoubleProperty;
import javafx.collections.*;
import javafx.event.*;
import javafx.scene.*;
import javafx.scene.control.ToggleButton;
import javafx.scene.effect.Glow;
import javafx.scene.input.MouseEvent;
import javafx.scene.paint.Color;
import javafx.scene.shape.*;
import javafx.scene.text.Text;
import javafx.stage.Stage;
import javafx.util.Duration;

/**
* Example of drawing text along a cubic curve.
* Drag the anchors around to change the curve.
*/
public class BezierTextPlotter extends Application {
    private static final String CURVED_TEXT = "Bézier Curve";

    public static void main(String[] args) throws Exception {
     launch(args);
    }

    @Override
    public void start(final Stage stage) throws Exception {
     final CubicCurve curve = createStartingCurve();

     Line controlLine1 = new BoundLine(curve.controlX1Property(), curve.controlY1Property(), curve.startXProperty(), curve.startYProperty());
     Line controlLine2 = new BoundLine(curve.controlX2Property(), curve.controlY2Property(), curve.endXProperty(), curve.endYProperty());

     Anchor start = new Anchor(Color.PALEGREEN, curve.startXProperty(), curve.startYProperty());
     Anchor control1 = new Anchor(Color.GOLD, curve.controlX1Property(), curve.controlY1Property());
     Anchor control2 = new Anchor(Color.GOLDENROD, curve.controlX2Property(), curve.controlY2Property());
     Anchor end = new Anchor(Color.TOMATO, curve.endXProperty(), curve.endYProperty());

     final Text text = new Text(CURVED_TEXT);
     text.setStyle("-fx-font-size: 40px");
     text.setEffect(new Glow());
     final ObservableList<Text> parts = FXCollections.observableArrayList();
     final ObservableList<PathTransition> transitions = FXCollections.observableArrayList();
     for (char character : text.textProperty().get().toCharArray()) {
      Text part = new Text(character + "");
      part.setEffect(text.getEffect());
      part.setStyle(text.getStyle());
      parts.add(part);
      part.setVisible(false);

      transitions.add(createPathTransition(curve, part));
     }

     final ObservableList<Node> controls = FXCollections.observableArrayList();
     controls.setAll(controlLine1, controlLine2, curve, start, control1, control2, end);

     final ToggleButton plot = new ToggleButton("Plot Text");
     plot.setOnAction(new PlotHandler(plot, parts, transitions, controls));

     Group content = new Group(controlLine1, controlLine2, curve, start, control1, control2, end, plot);
     content.getChildren().addAll(parts);

     stage.setTitle("Cubic Curve Manipulation Sample");
     stage.setScene(new Scene(content, 400, 400, Color.ALICEBLUE));
     stage.show();
    }

    private PathTransition createPathTransition(CubicCurve curve, Text text) {
     final PathTransition transition = new PathTransition(Duration.seconds(10), curve, text);

     transition.setAutoReverse(false);
     transition.setCycleCount(PathTransition.INDEFINITE);
     transition.setOrientation(PathTransition.OrientationType.ORTHOGONAL_TO_TANGENT);
     transition.setInterpolator(Interpolator.LINEAR);

     return transition;
    }

    private CubicCurve createStartingCurve() {
     CubicCurve curve = new CubicCurve();
     curve.setStartX(50);
     curve.setStartY(200);
     curve.setControlX1(150);
     curve.setControlY1(300);
     curve.setControlX2(250);
     curve.setControlY2(50);
     curve.setEndX(350);
     curve.setEndY(150);
     curve.setStroke(Color.FORESTGREEN);
     curve.setStrokeWidth(4);
     curve.setStrokeLineCap(StrokeLineCap.ROUND);
     curve.setFill(Color.CORNSILK.deriveColor(0, 1.2, 1, 0.6));
     return curve;
    }

    class BoundLine extends Line {
     BoundLine(DoubleProperty startX, DoubleProperty startY, DoubleProperty endX, DoubleProperty endY) {
      startXProperty().bind(startX);
      startYProperty().bind(startY);
      endXProperty().bind(endX);
      endYProperty().bind(endY);
      setStrokeWidth(2);
      setStroke(Color.GRAY.deriveColor(0, 1, 1, 0.5));
      setStrokeLineCap(StrokeLineCap.BUTT);
      getStrokeDashArray().setAll(10.0, 5.0);
     }
    }

    // a draggable anchor displayed around a point.
    class Anchor extends Circle {
     Anchor(Color color, DoubleProperty x, DoubleProperty y) {
      super(x.get(), y.get(), 10);
      setFill(color.deriveColor(1, 1, 1, 0.5));
      setStroke(color);
      setStrokeWidth(2);
      setStrokeType(StrokeType.OUTSIDE);

      x.bind(centerXProperty());
      y.bind(centerYProperty());
      enableDrag();
     }

     // make a node movable by dragging it around with the mouse.
     private void enableDrag() {
      final Delta dragDelta = new Delta();
      setOnMousePressed(new EventHandler<MouseEvent>() {
       @Override
       public void handle(MouseEvent mouseEvent) {
        // record a delta distance for the drag and drop operation.
        dragDelta.x = getCenterX() - mouseEvent.getX();
        dragDelta.y = getCenterY() - mouseEvent.getY();
        getScene().setCursor(Cursor.MOVE);
       }
      });
      setOnMouseReleased(new EventHandler<MouseEvent>() {
       @Override
       public void handle(MouseEvent mouseEvent) {
        getScene().setCursor(Cursor.HAND);
       }
      });
      setOnMouseDragged(new EventHandler<MouseEvent>() {
       @Override
       public void handle(MouseEvent mouseEvent) {
        double newX = mouseEvent.getX() + dragDelta.x;
        if (newX > 0 && newX < getScene().getWidth()) {
         setCenterX(newX);
        }
        double newY = mouseEvent.getY() + dragDelta.y;
        if (newY > 0 && newY < getScene().getHeight()) {
         setCenterY(newY);
        }
       }
      });
      setOnMouseEntered(new EventHandler<MouseEvent>() {
       @Override
       public void handle(MouseEvent mouseEvent) {
        if (!mouseEvent.isPrimaryButtonDown()) {
         getScene().setCursor(Cursor.HAND);
        }
       }
      });
      setOnMouseExited(new EventHandler<MouseEvent>() {
       @Override
       public void handle(MouseEvent mouseEvent) {
        if (!mouseEvent.isPrimaryButtonDown()) {
         getScene().setCursor(Cursor.DEFAULT);
        }
       }
      });
     }

     // records relative x and y co-ordinates.
     private class Delta {
      double x, y;
     }
    }

    // plots text along a path defined by provided bezier control points.
    private static class PlotHandler implements EventHandler<ActionEvent> {
     private final ToggleButton plot;
     private final ObservableList<Text> parts;
     private final ObservableList<PathTransition> transitions;
     private final ObservableList<Node> controls;

     public PlotHandler(ToggleButton plot, ObservableList<Text> parts, ObservableList<PathTransition> transitions, ObservableList<Node> controls) {
      this.plot = plot;
      this.parts = parts;
      this.transitions = transitions;
      this.controls = controls;
     }

     @Override
     public void handle(ActionEvent actionEvent) {
      if (plot.isSelected()) {
       for (int i = 0; i < parts.size(); i++) {
        parts.get(i).setVisible(true);
        final Transition transition = transitions.get(i);
        transition.stop();
        transition.jumpTo(Duration.seconds(10).multiply((i + 0.5) * 1.0/parts.size()));
        // just play a single animation frame to display the curved text, then stop
        AnimationTimer timer = new AnimationTimer() {
         int frameCounter = 0;

         @Override
         public void handle(long l) {
          frameCounter++;
          if (frameCounter == 1) {
           transition.stop();
           stop();
          }
         }
        };
        timer.start();
        transition.play();
       }
       plot.setText("Show Controls");
      } else {
       plot.setText("Plot Text");
      }

      for (Node control : controls) {
       control.setVisible(!plot.isSelected());
      }

      for (Node part : parts) {
       part.setVisible(plot.isSelected());
      }
     }
    }
}
解決策のもう1つの可能性は、各テキスト文字を測定し、PathTransitionを使用せずにテキストの位置と回転を補間する数学を行うことです。しかし、PathTransitionはすでにそこにあり、私のためにうまくいきました(おそらくテキストの進歩のためのカーブの距離測定は私にとにかく挑戦するかもしれません)。追加の質問へ
回答は
あなたはあなたのコードを適応させることによってjavafx.scene.effect.Effectを実現することが可能であると思いますか? (それだけでこれを行うには、既存のPathTransitionを採用していたように)私の答えが用意されていませんベジエ曲線に沿ってテキストを表示するための数学を実行する必要になる効果を実装
号。
さらに、独自のカスタムエフェクトを実装するためのJavaFX 2.2には公開APIはありません。
類似のものを得るためにおそらく使用される可能性のあるDisplacementMapエフェクトが存在します。しかし、DisplacementMapエフェクト(およびおそらくテキストレイアウトを調整するエフェクト)を使用すると、テキストが歪む可能性が高くなります。
IMOでは、ベジエ曲線に沿ったテキストの描画は、エフェクト関連よりもレイアウトに関連しています。エフェクトを使用して移動するのではなく、レイアウトと回転を調整することをお勧めします。
また、JFXフレームワークで正しく統合するためのより良い方法があるかもしれませんか?
あなたはペインをサブクラス化しFlowPaneに似ていますが、パスではなく、直線に沿ってノードをレイアウトするカスタムPathLayoutを作成することができます。レイアウトされるノードは、各文字のTextノードによって構成されます。これは、私の答えで行ったのと同様です。しかし、それでもなお、正確にテキストをレンダリングしていないのは、等間隔の文字(kerningなど)を考慮したいからです。したがって、忠実度と正確さのためには、独自の低レベルテキストレイアウトアルゴリズムを実装する必要があります。 PathTransitionsを使用してこの回答で提供された「十分に良い」ソリューションが十分な品質でないことが判明した場合は、私の場合は、私はその努力に尽くします。


これがあなたに役立つかどうかはわかりません。私はunity3dのベジエ曲線に沿ってグラフィックスを動かさなければなりませんでした。私たちはsvgトレースパスを使いました。これは私たちが図書館を作るために使ったものです。 http://www.w3.org/TR/SVG/paths.html – MichelleJS
@MichelleJSありがとうございますが、SVGはjavafxでは実際にサポートされていません。 – gontard
これはおそらくあなたを助けるかもしれません:https://forums.oracle.com/thread/1712335 – Sebastian